Creating an Apple ID is an easy task that anyone can get done in only a few minutes! Whether you’re setting up a new iPhone, iPad, Mac or you just need a fresh account, we will guide you through the entire process step by step. You’ll easily unlock access to apple services.
What Is an Apple ID and how are they helpful?
An Apple ID is essentially your personal account with Apple. Your username and password combo that unlocks everything in the Apple ecosystem. You will need it to:
- Download apps from the App Store
- Access iCloud (Apple’s cloud storage service)
- Make purchases on iTunes or the Apple Store
- Use FaceTime and iMessage
- Find your device if it gets lost with Find My iPhone
- Back up your data
If you own any Apple device and want to use it fully you will need an Apple ID. The good news? It’s free to create and only takes a few minutes to do so.
What You’ll Need Before Starting
Make sure you have everything below:
- An email address (this will be your Apple ID username)
- A phone number (for account recovery and verification)
- A device with internet access (iPhone, iPad, Mac or even a Windows computer)
That’s it! You don’t need a credit card to create an Apple ID, though you’ll need one if you want to buy apps or content later.
Method 1: Create an Apple ID on Your iPhone or iPad
This is the most straightforward way if you have an Apple device. Here’s how:
Step 1: Open Settings
Tap the Settings app (the gray gear icon) on your home screen.
Step 2: Tap “Sign in to Your [Device]”
At the very top of the Settings menu, you’ll see a section that says “Sign in to your iPhone“. Tap on it.
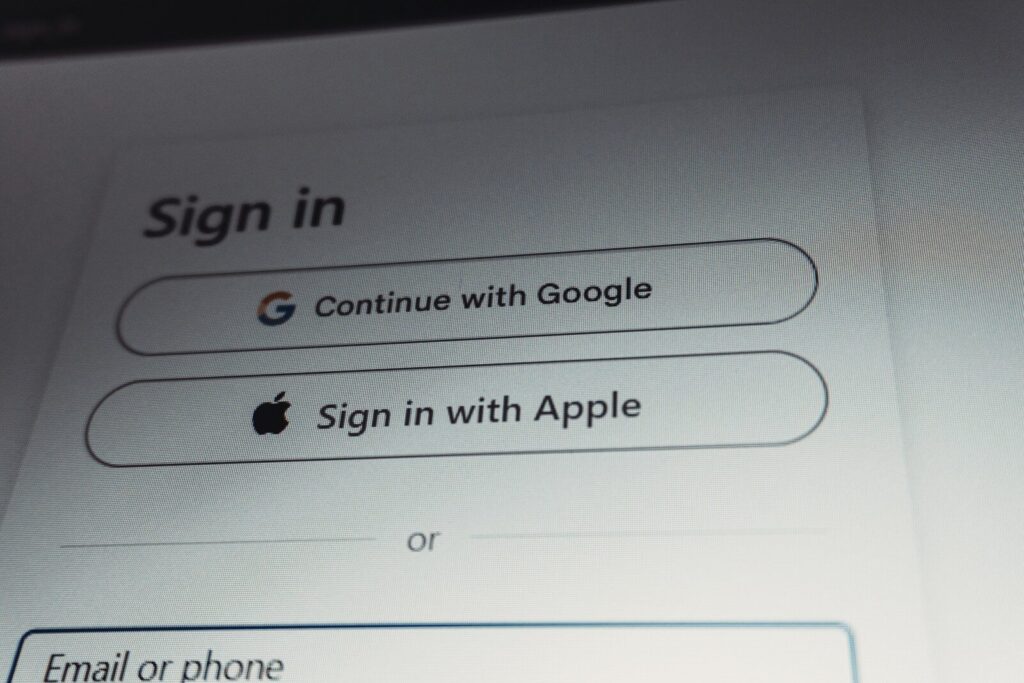
Step 3: Tap “Don’t Have an Apple ID or Forgot It?”
You’ll see a blue link at the bottom of the sign-in screen. This is exactly what you need.
Step 4: Select “Create a New Apple ID”
A menu will pop up with a few options. Choose “Create a New Apple ID” (not “Sign in with an existing Apple ID”).
Step 5: Enter Your Information
You’ll be asked to provide:
- Your name (first and last)
- Your birthday (Apple uses this for account security and age verification)
- Your email address (this becomes your Apple ID, choose one you have access to)
Step 6: Create a Strong Password
Apple will ask you to create a password. Make it strong by including:
- At least 8 characters
- One uppercase letter
- One lowercase letter
- One number
- One special character (!@#$%)
Try to avoid using a password you use for another service to help maintain security.
Step 7: Verify Your Email
Apple will send a verification code to the email address you provided. Check your inbox (and spam folder if it hasn’t arrived within a couple minutes) and enter the code when prompted.
Step 8: Verify Your Phone Number
You’ll receive a verification code via text message to your phone number. Enter it to confirm.
Step 9: Agree to Terms and Conditions
Read through Apple’s terms and tap “Agree” at the bottom.
Congratulations! Your Apple ID is now active. You’re all set to use your device fully.
Method 2: Create an Apple ID on a Mac or Windows Computer
If you don’t have an iPhone or iPad yet, you can create an Apple ID on a computer. Here’s how:
Step 1: Visit Apple’s Website
Go to appleid.apple.com in your web browser.
Step 2: Click “Create Your Apple ID”
You’ll see a button or link that says “Create Your Apple ID” on the sign-in page.
Step 3: Enter Your Information
Fill in:
- Your name
- Your email address (your future Apple ID)
- Your birthday
- Your phone number
Step 4: Create a Password
Follow the same password guidelines as above, use a strong and unique password.
Step 5: Answer Security Questions
Apple will ask you to answer two security questions (like “What’s your favorite movie?” or “What’s your pet’s name?”). These help you recover your account if you forget your password.
Step 6: Verify Your Email and Phone
Just like on a device, you’ll receive verification codes via email and text. Enter both to confirm your identity.
Step 7: You’re Done!
Once verified, your Apple ID is ready to use.

Common Questions People Ask
Can I use a Gmail or Outlook address for my Apple ID?
Yes, you don’t need an iCloud email address. Any email address works. Gmail, Outlook, Yahoo or any other email provider. If you want to use iCloud email (which works well with Apple devices), you can create that during the sign-up process.
What if I forget my password?
No problem, on the sign-in screen, tap “Forgot Apple ID or password?” and follow the prompts. You’ll verify your identity using your email or phone number, then create a new password.
Do I need to pay anything to create an Apple ID?
Creating an Apple ID is free, you only pay if you buy apps, subscriptions or content from Apple’s stores.
Can I change my Apple ID email later?
Yes, you can change the email associated with your Apple ID, but it can cause problems, especially if you are using it on multiple devices. Easiest to choose one and stick with it.
What’s the difference between an Apple ID and iCloud?
Apple ID = your account with Apple (used for signing in and purchases)
iCloud = Apple’s cloud storage and backup service (requires an Apple ID to use)